Part 1: Tone Output
After learning about digital output last week (digital output being a binary output, i.e. a switch turning on or off), I learned about analog output, an output that gives a range of values, in this lab. The primary output of this part of the lab was sound. This was very fun to mess around with but also very informative.
I setup the circuit following the image provided in the lab and ran the code copied:
void setup() {
  // nothing to do here
}

void loop() {
  // play the tone for 1 second:
  tone(8, 440,1000);
  // do nothing else for the one second you're playing:
  delay(1000);
}
It was simple and showed how easy it is to control sound with the tone() function in Arduino, playing a 440 hertz frequency for 1 second in the above code. The hardest part was getting the wires to stay hooked up to the speaker. I need to learn how to solder and stick some wires on there.
The next part was trickier because I had to incorporate the map() function from the Arduino library, in order to use analog input to produce sound.
void setup() {
  // nothing to do here
}

void loop() {
  // get a sensor reading:
  int sensorReading = analogRead(A0);
  // map the results from the sensor reading's range
  // to the desired pitch range:
  float frequency = map(sensorReading, 200, 900, 100, 1000);
  // change the pitch, play for 10 ms:
  tone(8, frequency, 10);
  delay(10);
}
I got hung up on this for a little bit because at first, this code did not work.
My circuit setup had been working so I dug into the code and debugged. I added Serial.begin(9600) in setup() and checked to see that my analog input was working, which it was. I noticed in the Arduino reference page for the tone() function that the second argument of the function (where the frequency variable is) takes an unsigned int as a datatype. I thought this might have been the issue and casted the variable frequency as an integer.
void setup() {
  Serial.begin(9600);
}

void loop() {
  // get a sensor reading:
  int sensorReading = analogRead(A0);
  //Serial.println(sensorReading);
  // map the results from the sensor reading's range
  // to the desired pitch range:
  float frequency = map(sensorReading, 200, 900, 100, 1000);
int frequencyA = (int) frequency;
  // change the pitch, play for 10 ms:
  tone(8, frequencyA, 10);
Serial.println(frequency);
  delay(10);
}
This change did not fix anything. By hovering over the function in the IDE, I noticed that the tone() function automatically casted any number passed as an argument in it. That is helpful to know in the future, as I am used to those kinds of problems in Java but won’t have to worry about them as much here.
After reading the code and lab more, I realized I needed to change the stock numbers in the map() function to the actual range of values from my analog sensor. The stock code had made my analog input values as negative, which the tone() function does not like at all (since what does a negative sound even sound like).

Therefore, I checked the Serial monitor for the range of values when I pressed on the FSR, and the minimum was 0 and the maximum was 600. I changed the code to:
void setup() {
  Serial.begin(9600);
}

void loop() {
  // get a sensor reading:
  int sensorReading = analogRead(A0);
  //Serial.println(sensorReading);
  // map the results from the sensor reading's range
  // to the desired pitch range:
  float frequency = map(sensorReading, 0, 600, 100, 1000);
  // change the pitch, play for 10 ms:
  tone(8, frequency, 10);
Serial.println(frequency);
  delay(10);
}
And it worked.
It is amazing to manipulate sound like this. One, electronic sound itself sounds cool and warbly. Second, the possibilities of playing with sound and code are limitless. I would love to make a device playing with sounds and having physical objects be the instrument for sounds. It might be a possible midterm project for me, we will see. I further played with the example in the lab, reading from the frequencies pre-defined by some complex music theory calculations.
/*************************************************
* Public Constants - pitches.h
*************************************************/

#define NOTE_B0  31
#define NOTE_C1  33
#define NOTE_CS1 35
#define NOTE_D1  37
#define NOTE_DS1 39
#define NOTE_E1  41
#define NOTE_F1  44
#define NOTE_FS1 46
#define NOTE_G1  49
#define NOTE_GS1 52
#define NOTE_A1  55
#define NOTE_AS1 58
#define NOTE_B1  62
#define NOTE_C2  65
#define NOTE_CS2 69
#define NOTE_D2  73
#include "pitches.h"
// notes in the melody:
int melody[] = {
NOTE_C4, NOTE_G3,NOTE_G3, NOTE_GS3, NOTE_G3,0, NOTE_B3, NOTE_C4};
// note durations: 4 = quarter note, 8 = eighth note, etc.:
int noteDurations[] = {4,8,8,4,4,4,4,4 };
void setup() {
// iterate over the notes of the melody:
for (int thisNote = 0; thisNote < 8; thisNote++) {
// to calculate the note duration, take one second
// divided by the note type.
//e.g. quarter note = 1000 / 4, eighth note = 1000/8, etc.
int noteDuration = 1000/noteDurations[thisNote];
tone(8, melody[thisNote],noteDuration);
//pause for the note's duration plus 30 ms:
delay(noteDuration +30);
}
}
void loop() {
// no need to repeat the melody.
}Playing songs through circuits would be great but I also love the idea of a sound installation, as I’ve seen in my Hypercinema class. These are the ingredients of some fascinating art but also could design actual useful systems for communicating through sound that could help with accessibility.
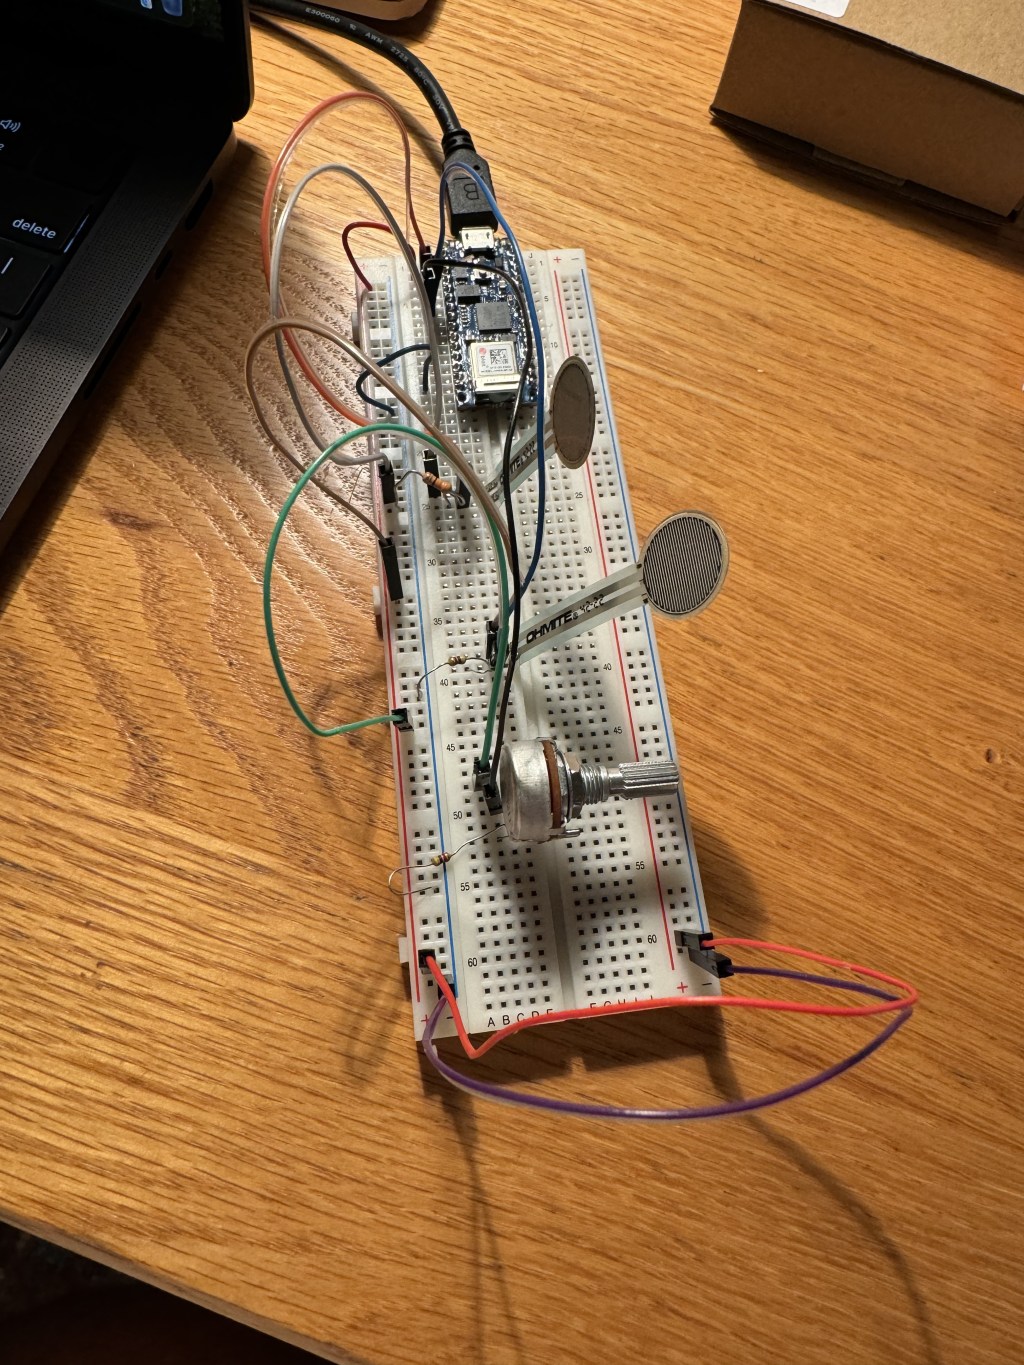
I didn’t quite get the more complex circuit setup with 3 FSRs to work. I set it up with 2 FSRs and a potentiometer (just to see) but sound would not produce as expected. I will venture to the PComp help session to see if I can create it there.
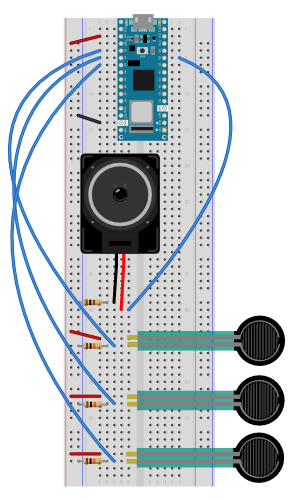

Update: Success
I went to work on the lab further on Monday afternoon. Though I did not seek help of the residents, I figured out what went wrong. First, I started with two Force Sensing Resistors with the speaker and limited the code to them. It still wasn’t producing sound. Then, I changed the resistor connected to the speaker and ground from a high one (unsure the exact one but it was a tan shell with red and green bands) to a lower one (blue with black stripes, 100 ohm). That worked well, as you can see below.
Then, I added the potentiometer and upped the threshold since the potentiometer’s values started higher than the FSRs. As a result, I got a working keyboard of sorts!
Part 2: Servo Motor
After the code confusion and resolution with the speaker, setting up the Servo Motor was a breeze. I followed the code in the lab and the setup. It worked like a charm.
#include "Servo.h"      // include the servo library

Servo servoMotor;       // creates an instance of the servo object to control a servo
int servoPin = 9;       // Control pin for servo motor
// time when the servo was last updated, in ms
long lastMoveTime = 0;

void setup() {
  Serial.begin(9600);       // initialize serial communications
  servoMotor.attach(servoPin);  // attaches the servo on pin 9 to the servo object
}

void loop() {
  int analogValue = analogRead(A0); // read the analog input
  Serial.println(analogValue);      // print it

  // if your sensor's range is less than 0 to 1023, you'll need to
  // modify the map() function to use the values you discovered:
  int servoAngle = map(analogValue, 0, 1023, 0, 179);

  // move the servo using the angle from the sensor every 20 ms:
  if (millis() - lastMoveTime > 20) {
    servoMotor.write(servoAngle);
    lastMoveTime = millis();
  }
}
This little servo motor opens a lot of doors (not literally) with how I can program devices to push and pull in physical space. Attaching some strings to it or incorporating it into a Rube Goldberg machine.
I appreciate this lab for helping set the foundation for all kinds of device experimentation going forward.

Leave a comment